Welcome

Abi Crafts :)

Tuesday, November 27

How To- Duct Tape Bows

To start off: YAAAY! I found my camera charger and was able to complete this tutorial!!! Yaaay! I'm so happy right now, you have no idea. 

But back to the good stuff. As I have said before, duct tape is my favorite craft tool and to prove it, I will, yet again, post another duct tape tutorial, this time on bows.  These have to be the easiest duct tape craft to do, I have done so many of them that now they take 2-3 minutes each. Soooo easy. Here are the instructions:


1.) Gather your materials
You'll need duct tape 
a hair bow or a bobby pin
an X Acto Knife (optional)
scissors (optional)

(Please excuse the cut marks, this is a temporary cutting board, it's awful, I know)
2.) Cut two pieces of duct tape
They should be about 4 inches and they should both be the same size

3.) Fold them both together, sticky sides in
Uh.. ya... That's about it.

4.) Round the Edges
You can use the xacto knives here but I find it easier to use the scissors here.

5.)Pinch
Here you just want to pinch the bottom of the bow right in the middle
so the sides of the bow are even

(I know, I would be a gorgeous hand model)
6.) Fold sides over
Fold the sides over the pinched area giving it a bow shape.

7.) Cut a strip of duct tape 
This strip should be about as wide as the pinched portion.

8.) Wrap 
Wrap the strip around the pinched portion.

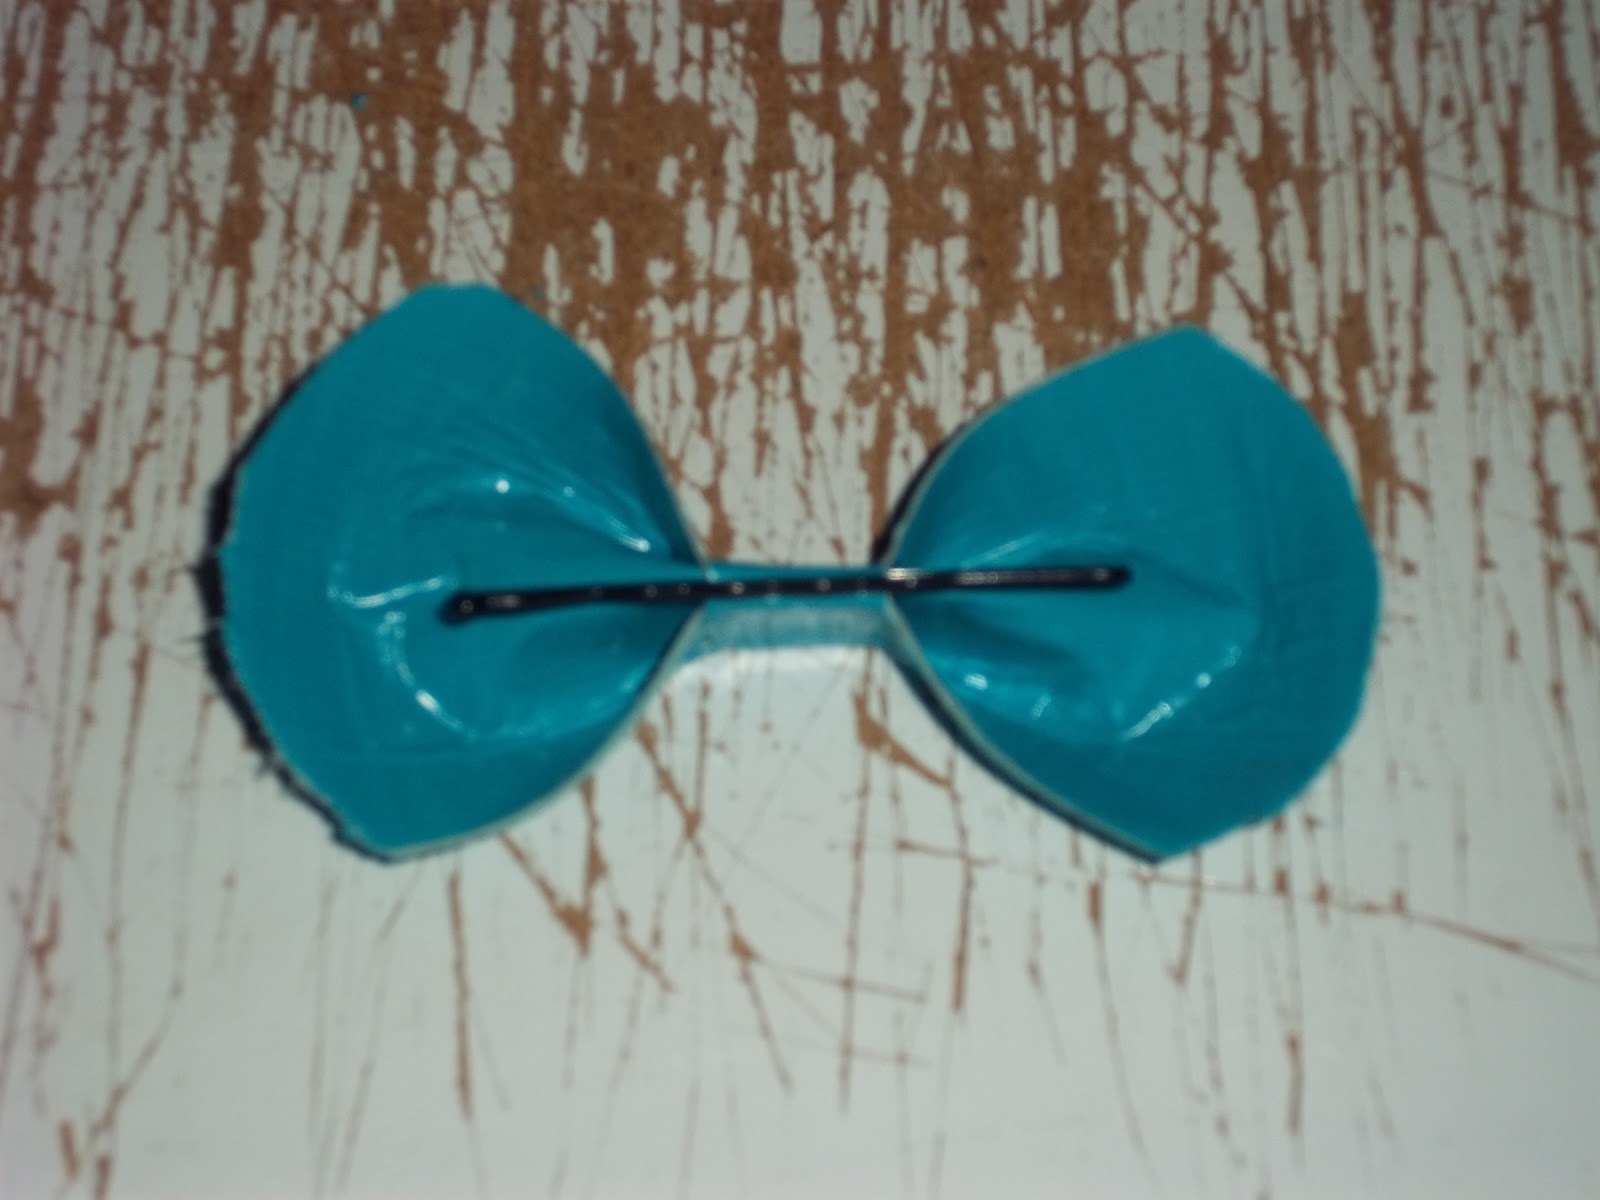
9.) Insert Bobby pin
Flip over the duct tape bow and slide the bobby pin into place
Note: If you want to use a hair tie instead, when you are pinching 
the bow, slide the hair bow inbetween one of the sides and 
then wrap around the strip.

Voila! You are done :) (and they also come in cute ^puppy sizes)


Monday, November 26

Light Bulb Hot Air Balloon- Cloth

I was reading over some of my old posts and noticed that I said I would give instructions 
on how to make a light bulb hot air balloon with cloth. Now I would love to go and do this but 
my camera charger is missing and yadda yadda yadda. So I thought I would
 just upload a link to all you nice folk. :)

WHY?!!! WHY???!!!

For about an hour today I ran around the house, I was throwing stuff everywhere, looking for my camera charger. I have a Kodak Easyshare M530, so my cord that plugs into the computer has this little attachable device that plugs into a wall outlet and lets me charge my camera that way. And guess what? Yup, I found the cord, but not the charger. Awesome. Just awesome.  That makes me feel just great.

Sunday, November 25

Biggest Fashion Rip Off?

As the title says, the biggest fashion rip off is quite simply infinity scarves. On one website, the cheapest I could find was $20.  Now let us not lie to ourselves, $20 doesn't seem like much, but in all fairness, it kind of is. The US average hourly earning is about $24. Sooo... you just worked one hour to pay for one stupid (they aren't that stupid, I actually quite like infinity scarves) scarf you could make yourself. Seriously! Got an old shirt? Upcycle it into an infinity scarf with just a little bit of thread and a needle. It takes 5 minutes, tops.  Go to your local fabric store and buy a small strip of cloth you like and sew. Boom. Done. Stores, you aren't fooling me.

Oopsie...

I'm not good at committing to things.  I feel that that really didn't need to be said based off my current lack of posts buuut.... now I have an excuse. Yes, you see, my cameras charge cord (which I also use to connect to my computer to upload the pictures) has gone missing!
.
See, Mr. Bill knows what I'm talking about. (Sorry for the random photo, I just thought it was cute)
But anyways, that is my excuse, but I will try to find the cord and get back to making stuff.

Friday, July 6

Ya......

That duct tape wallet tutorial ain't comin' any time soon....... : / ya......... lol, I can not stick to anything I do. I will try to get something up soon. let me think...

-Abi

Tuesday, May 1

Yikes...

So I haven't done anything on this blog in... a while. I've been super busy and I have decided I'm not doing the photo thing anymore, I got tired of it and blahblahblah. So either later today or tomorrow, I'm going to make a post on how to make a duct tape wallet!
-Abi

Friday, April 27

How To- Duct Tape Flower Pens

So today is April 27th and that means that today's picture category is something I made, so I figured I might as well just tell you how I made this at the same time. 

Today I'm going to make a black duct tape flower.  This is how I did it:

Step 1
Gather your materials:

Step 2
Step 3
Step 4
Step 5
Continue folding and wrapping the tape around the pen until your liking! I like to make my flowers kinda big.

Step 6
Yay! You are now done! And you have a very crafty and flowerish pen!


Oh yeah! And that <<< is my picture for todays little photo category!


Happy Crafting!
-Abi

Thursday, April 26

I'm Hoping You Didn't Throw Out the Scraps

Just as the title says, I'm hoping you didn't! If you made a t-shirt pillow out of a long sleeved shirt, DON'T THROW AWAY THE SLEEVES! 'Cause I've got something else in mind for them, other than the trash.


So let's just start off with this: Scarves are expensive. They really are.  Have you noticed that? It's sad that someone would go to the store to buy an $8 piece of fabric when you can make one so easily!


Now, back to the shirt! 


Step 1
Cut both sleeve shirts in half where the stitching is.
Like a'so!
NOTE: I cut it like that (with a big semi-circle) because it adds
 extra flare the way I put it together in the end.

Step 2
Once you have done that to both sleeves, attach both sleeves together at the smaller end. Sew 'em up!
Ya, ya, I know.  I'm not that awesome at sewing :P

Step 3
Wrap around neck and if you have a pin, or as I used, a stretch ring, pin (or wrap around both pieces of the scarf "like a'so!"

There! Easy-peasy! And super
cute ;)
-Abi

It's April 26th!

Today's picture category is.... something you can't live without! And what can I not live without? This:

Yup.  Mascara.  My eyelashes aren't the longest so I gotta have this by my side at all times! And look what it's on ; my t-shirt pillow! lol!

-Abi

How To- Throw Pillow from old shirt

Let me just say that yesterday, I was super bored.  I had nothing to do.  So I went through my closet and found an old shirt of mine with a cute design on it.  Plus, it was the exact color I could use to help tie together my room.... so.... the throw pillow was made!  And here's how:


Step 1
Gather an old shirt, a needle, thread, stuffing, and scissors.


Step 2
Cut the shirt (both front and back) into a square, rectangle, or circle, depending on what you want.
It doesn't have to be perfect, you are going to sew it up.

Step 3
Flip over the side with the design so that when you sew it, the pillow is inside out.

Step 4
Start sewing and remember to leave a spot open so you can make it right side-out and so you can stuff it.

Step 5
When you are done sewing, flip it back out and stuff the pillow with just enough stuffing/fluff.
Step 6
Now, that little spot you left open is going to need to be sewn up.  I'm not a big sewing expert, so I don't know the terminology and I'm not that great at sewing too, so just bear with me on this next picture.
 Lol, isn't it beautiful? Oh god, well, at least it was a small part? Right?

Well, your done! Enjoy your t-shirt pillow!

Here is another t-shirt pillow I made!

Happy Crafting!
-Abi

Wednesday, April 25

Eyeshadow!

Check these out:


These are "Color Me Glow; Profusion" eye shadow. When I first got these, (it was a gift) I was in that state of mind of "Awesome (sarcasm)... These can not be that good." I tried them on, and guess what? I LOOOOVE these!  They work perfectly, they go on wonderfully, and the colors are beautiful! Where did I get them? At Walgreens.  That's right, Walgreens, and I can not get enough of these!  They are only like $2 too! Gosh, these are just great.  Seriously, if you ever see this, you have to get them!


Now excuse me, I have some makeup to put on.
-Abi

How To- Fishtail Friendship Bracelet

Just yesterday I made a fishtail friendship bracelet and I figured I could share with you how to make one!

Step 1
I used 6 pieces of string to make this bracelet, you can use more or less but I figured six would be just right.
Cut the strings a little bit longer than your wrist, probably about 1-2 inches longer.
These are the colors I used, but you can use whatever you want.

Step 2
Wrap a small section around your finger and tie a knot to make a small loop.
Try to make the strings on the end shorter than what  I did, you don't want to cut away
 from the already pretty short length of the string.

Step 3
Now, you want to fishtail the bracelet.  If you know how to fishtail hair, perfect! If you don't, well, here's how!
First, split the string into two groups, both groups should have 3 strings in them if you decided on a total of six strings.  Then, take one string from the end of one of the groups and bring it over the other strings in the group and into the other group.  Now take the string all the way at the end in the other group and bring that into the first group.  Continue with this until you have a lot of space on the end (but not too much.)

Step 4
Tie a knot on the very end and attach a bead in front of the knot.  Then tie a knot after the bead to secure it.
This is the bead I used, sorry it's hard to see!

Your done! This is what mine looked like:
Happy Crafting!
-Abi

It's April 25th!

Its the 25th, so now today's picture category..... COLORFUL! Take a picture of anything colorful.
Here is my picture:
This is a quilt that I have been making for a while now.  It's a great rainy day activity and all you do is just tie knots connecting the two patches! I thought it was the perfect picture for a "colorful" day! :)

Tuesday, April 24

Pinterest!

Check out this great website if you haven't already seen it called Pinterest (pinterest.com) It is super great and has some awesome craft ideas on there! (Hey, and maybe you'll, you know, pin something on my website?) lol :)
-Abi

Photo Fun :)

I saw this really neat photo idea so I thought, "Why not make my own?" And that is what I'm doing :)  Starting today, I'm going to make a calender from today till the very last day in May with photos! Feel free to join along and share some of your photos with me!
So, on the 24th of April, the photo will be of something new. That means that, if you are willing to participate, send me a picture of something you just got that is new or just new to you and that you love!
Here is my pic:
It's my new super chic lamp! I love it! It really ties my room together! :)

How To- Yellow Blossom Tree


How to make a pretty yellow blossom tree- SUPER EASY!


Step 1
Find a whole bunch of pretty good sized sticks like those ^^^

Step 2
Take yellow tissue paper and rip it up into different sized rectangles

Step 3
Attach twist ties in the middle of the flower leaving some twistiness at the top (you are using the same twist-tie to attach the flower onto the stick)

Step 4
Twist the yellow tissue paper onto the sticks. Your finished result should look something like that ^^^

Monday, April 23

How To- Duct Tape Bracelets


Duct tape! My favorite craft tool :)

These here are duct tape braided bracelets, they are super easy, quite comfortable, and amazingly adorable!
And isn't that what everyone wants; easy and adorable? Well, I do.


Step 1
Cut out three strips of different colored duct tape that are about 3-4 inches longer than your wrist. Then, cut out one 1 inch piece of duct tape (it can be any of the three colors you want).

Step 2
Take one strip of duct tape and start folding it in so that when the whole strip of duct tape has been folded over, it is about a centimeter wide. Do that to the other two strips of duct tape and place them under the one inch piece leaving a little bit of sticky tape at the top (you are going to use that to connect it at the end.)

Step 3
Braid the three pieces together.
Note: If you braid these like you would hair, be careful, sometimes these bend weird. So when you are braiding be sure to kind of fold these over the middle string to make almost an "L" shape.

Step 4
Carefully holding the three straps lift up the end with the tape and bring it around to connect with the other side and wrap the tape around securing all straps.

Hopefully it fits! Remember to braid as tightly as possible! You don't want it to fall apart! :)
-Absadoodle

How To- Lightbulb Hot Air Balloons!

Can you guess what this is? Yes, a hot air balloon, but it's also an old light bulb! So quit throwing those away, the next time a light bulb
burns out, remember this!
Now, there are two ways you can do this. You can just paint the bulb like it is in this picture or you can glue fabric onto it to give it a cute pattern. However, I only have time to tell you how to paint it! Sorry! I'll tell you the other one later! :)

Materials
1 old light bulb
Some string or thread
1 water bottle cap
(optional) a cute little critter to ride in the basket

Step 1
Paint! However you like in whatever pattern! I did the colors of the rainbow all around the bulb.

Step 2
Paint the basket! The basket is the water bottle container. On a side note, I absolutely hate those new little itty-bitty caps on water bottles but you have to make do with what'cha got.

Step 3
Cut 2 pieces of string, one should be about an inch longer than the other. With the longer piece of string, tie a little loop at the very top in the very middle.

Step 4
Glue! Use a hot glue gun to glue one piece of string on both sides all the way to the bottom. Repeat with the other string.

Step 5
Trim some of the string to make them pretty even.

Step 6
Glue the string to the side of the water bottle cap basket and then bend the string over and glue onto the bottom of the basket!

Your done! Simple and cute! Love it :)
-Absadoodle

Hey!

Hey! My name is Absadoodle! (Not really, hopefully you guessed that, but for security reasons blahblahblah...) Simple little crafts are my life! If I see something that is easy and super cute, Ima makin' it! I'll be posting lots of random little things on here and if you have any suggestions, leave 'em in the comments! :) Happy Crafting!